User Guide
Ultimate DivocTracker (UDT) is a desktop app for managing COVID-19 contacts in school administration, optimized for use via interacting with the application through easy-to-use commands on a user-centric interface. Ultimate Divoc Tracker can get your contact-tracing tasks done faster than traditional GUI apps.
School administrators (like teachers) in charge of managing COVID-19 can use UDT to easily track COVID-19 cases amongst the student population with ease and concentrate on what matters most, the education of the students.
Through this user guide, you will learn how to use UDT effectively and efficiently, to manage COVID-19 cases in your schools. Features below are accompanied by instructions, figures and examples to help you understand how to use them. A glossary is included at the end to clarify any technical or vague terms used.
Content Page
- Quick start
- About UDT
-
Features
-
Add a student:
add -
List all students:
list -
Find student by name:
find -
Find student by status:
findstatus -
Find student by class:
findclasscode -
Find student by activity:
findactivity -
Edit student’s personal details:
edit -
Delete a student:
delete - Right-Click Help Menu
-
Viewing help window:
help -
Clearing the data:
clear -
Exit the application:
exit
-
Add a student:
- Saving the data
- Editing the data file
- Frequently Asked Questions
- Command Summary
- Glossary
Quick start
- Ensure you have Java 11 or above installed on your Computer.
- You can download Java 11 from this link.
- To check which version of Java you have installed:
- Type “Command Prompt” into the search bar next to your Start menu, and click on it when it appears in the search results.
- Type “java -version” into the Command Prompt, then press Enter on your keyboard.
- Download the latest udt.jar from our GitHub repository.
- Copy the file to the folder you want to use as the home folder for your Ultimate Divoc Tracker application.
- Double-click the file to start the app. The GUI similar to the one below should appear in a few seconds. Note how the app contains some sample data.
- Alternatively, running the file via command line can also start the app. (In the event double-click does not work)
- Navigate to the folder containing the udt.jar file.
- Type
cmdinto the navigation bar in Windows Explorer, and press Enter to launch Command Prompt in that folder location. - Type
java -jar udt.jarto launch UDT from the Command Prompt.
- Alternatively, running the file via command line can also start the app. (In the event double-click does not work)
- Refer to the Features below for details of each command.
Installation notes:
- Application save data will be stored in the same folder containing the udt.jar application.
- Currently officially supported for Windows, Mac and Linux platforms.
About UDT
Before we get into the details of what UDT can do, let’s first bring you through what the application will look like.
 |
|---|
| Figure 1 - GUI |
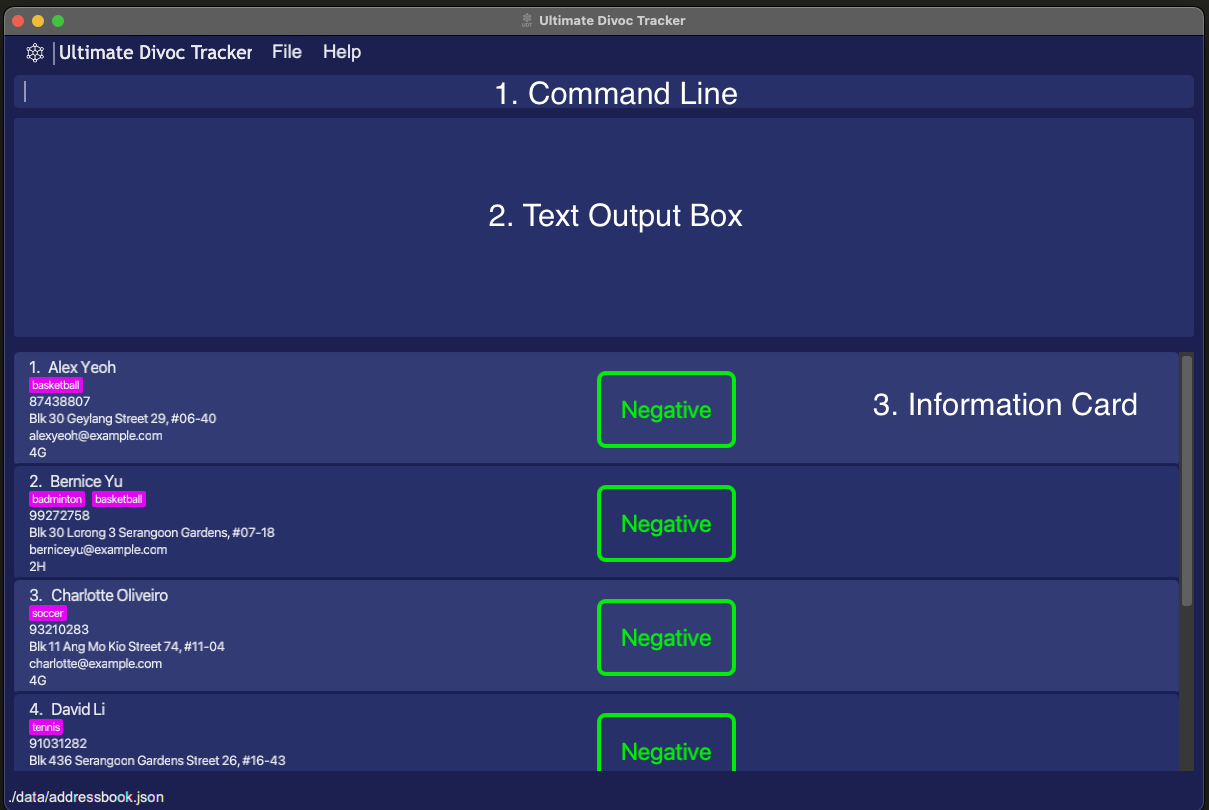
As seen in Figure 1 above, the application contains 3 main segments.
Firstly, the Command Line (area to input commands) is at the top of the application and can be easily seen by the blinking cursor/insertion point.
Secondly, the box beneath the Command Line is where the application will produce any text outputs or errors if the command provided requires so.
Lastly, each information card contains the following details of the student and are presented in order:
- Name
- Activity/Activities
- Phone Number
- Address
- Email Address
- Class
- COVID-19 Status
 |
|---|
| Figure 2 - Information Card |
With UDT, you can update and track COVID-19 Cases in your school, keep track of Close-Contacts, to perform timely updates to parents and Next-of-Kin. Filter through the endless list of students with a simple command to extract details on the cases by class, or by activities (CCAs etc.).
Graphical User Interface
Graphical User Interface (GUI) has a locked aspect ratio to prevent the GUI elements from producing any unintended cosmetic problems
- This also applies to maximising of application to full screen
Features
Below are a set of commands that can be used in the UDT. Their formats and examples are provided along with each feature.
- Words in
UPPER_CASEare the user inputs to be supplied.- Items in square brackets
[]are optional.
Add a student: add
Adds a student to the tracking list
- Format:
add n/NAME p/PHONE_NUMBER e/EMAIL a/ADDRESS cc/CLASS s/STATUS [act/ACTIVITY] [act/MORE ACTIVITIES]-
NAMEtakes in alphabetical characters and have a character limit of 50 -
ADDRESStakes in any characters and have a character limit of 70 -
ACTIVITYtakes in alphanumeric text and have a character limit of 50 -
CLASStakes in a number and alphabet pair- Eg.
4A
- Eg.
-
EMAILfollows the standard email formatting- Accepts input such as alphanumeric inputs, “-“, “_”, and “+”
- Eg.
johntan@example.com
-
PHONE_NUMBERtakes a sequence of numbers- Requires at least 3 numbers up to a maximum of 15 numbers
-
STATUStakes either of these textsPositive,Negative,Close-Contact-
STATUSis case-sensitive and should strictly follow the texts stated above
-
-
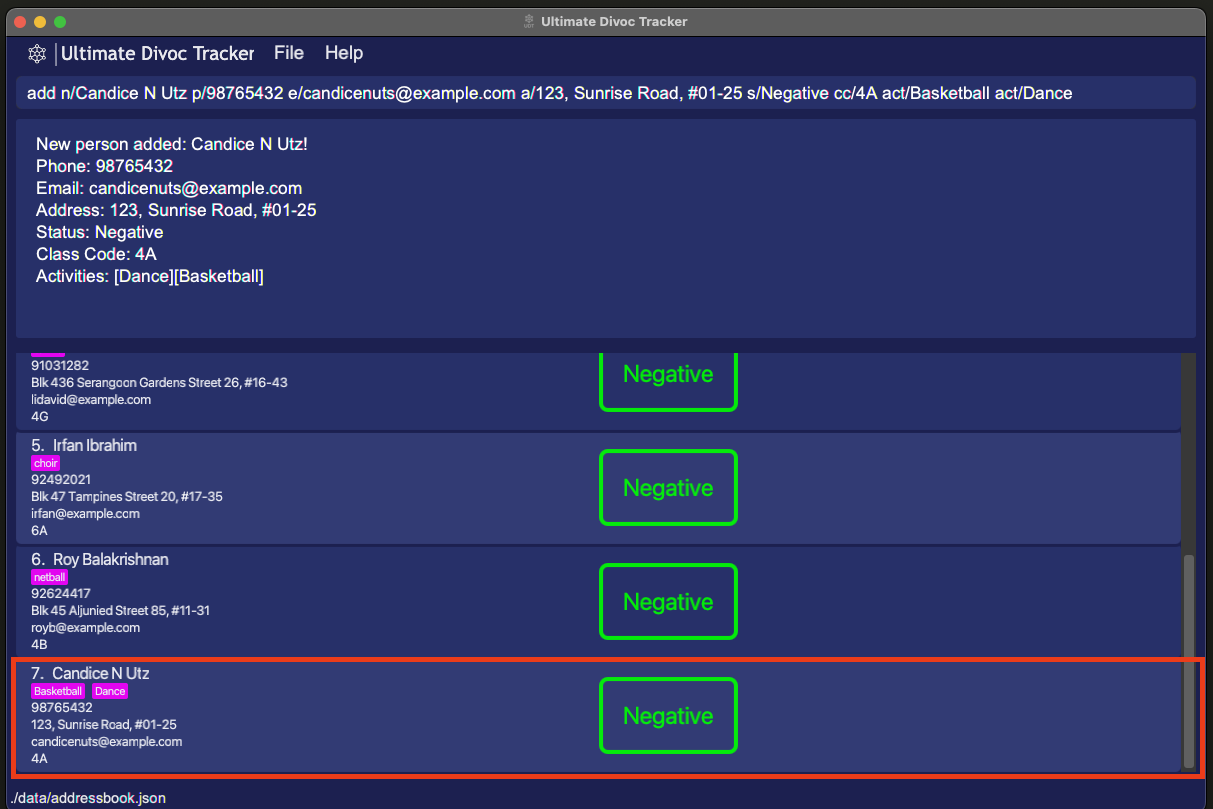
- Examples:
add n/John Doe p/98765432 e/johnd@example.com a/John Street, Block 123 #01-01 cc/5A s/Negativeadd n/Candice N Utz p/98765432 e/candicenuts@example.com a/123, Sunrise Road, #01-25 s/Negative cc/4A act/Basketball act/Dance
 |
|---|
Figure 3 - add Command |
Tips:
- Multiple activity tags can be added to a single student by using multiple
act/prefixes- Eg.
act/choir act/dance- A student can also have no activity tags
- User inputs can be in any order
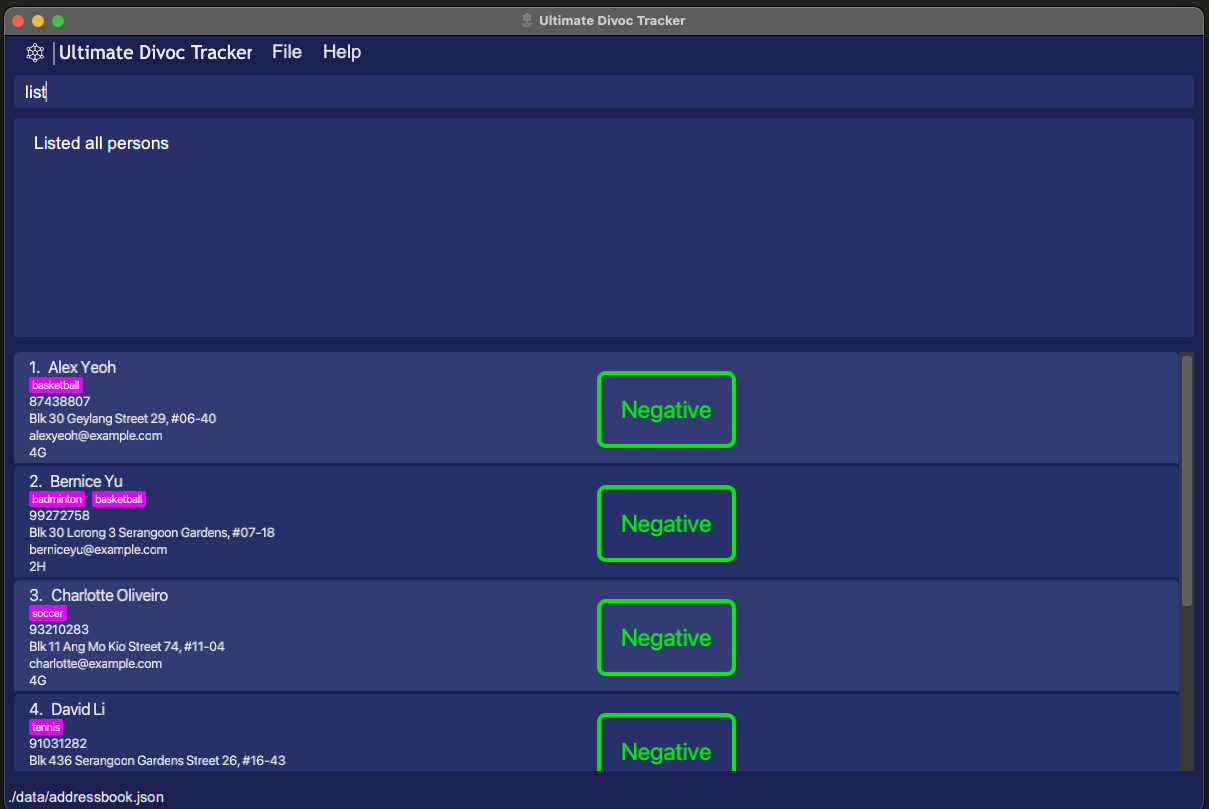
List all students: list
Shows a list of all students in the application.
- Format:
list- Any user input after
listis ignored -
list 12345 johnis the same aslist
- Any user input after
 |
|---|
Figure 4 - list Command |
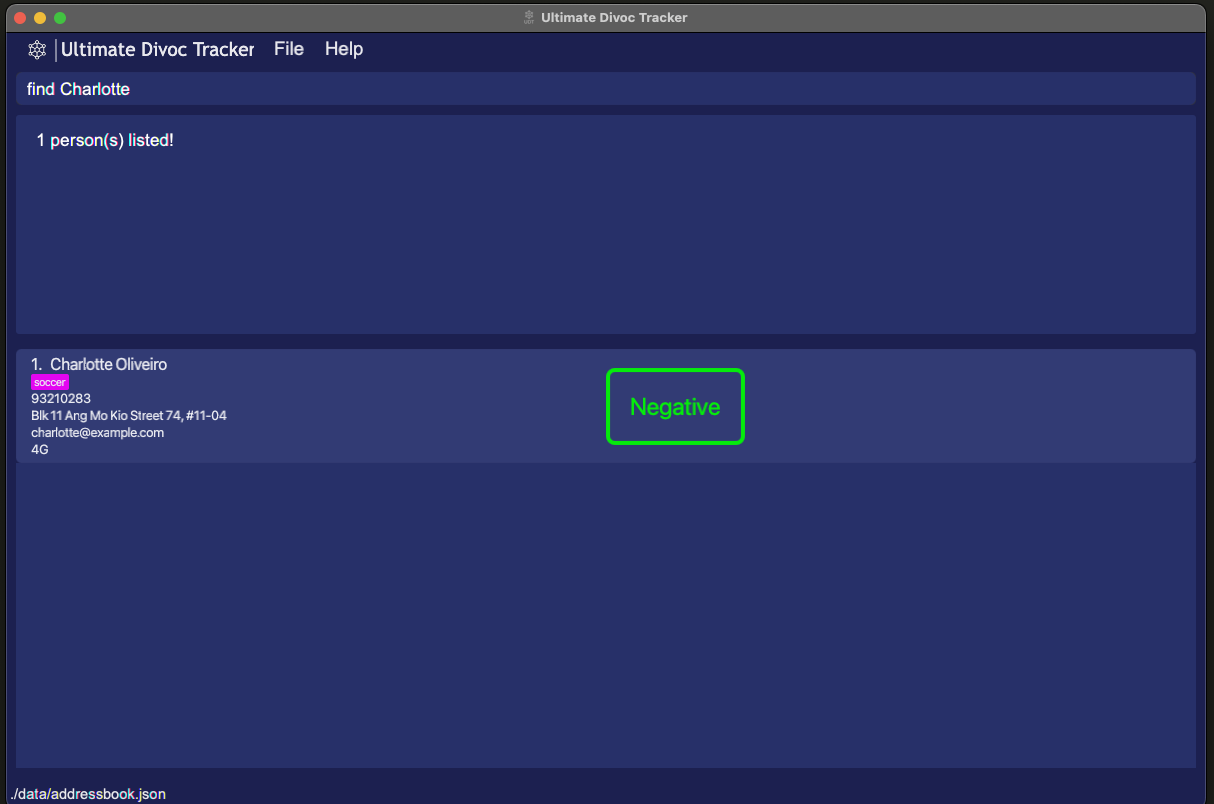
Find student by name: find
Find an existing student in the application by their name
- Format:
find NAME- Returns a list of students with the specified
NAME- If no one with the specified
NAMEis found, an empty list will be shown
- If no one with the specified
-
NAMEis case-insensitive - Order of words in
NAMEis irrelevant-
find yeoh alexcan find student “Alex Yeoh”
-
- Searching for name returns a list of names contains the provided name
-
find johncan find students “John Tan” and “John Lee”
-
- Returns a list of students with the specified
- Example:
-
find bernicewill find student “Bernice Yu”
-
- Eg.
find alex bernicewill find students “Alex Yeoh” and “Bernice Yu”
 |
|---|
Figure 5 - find Command |
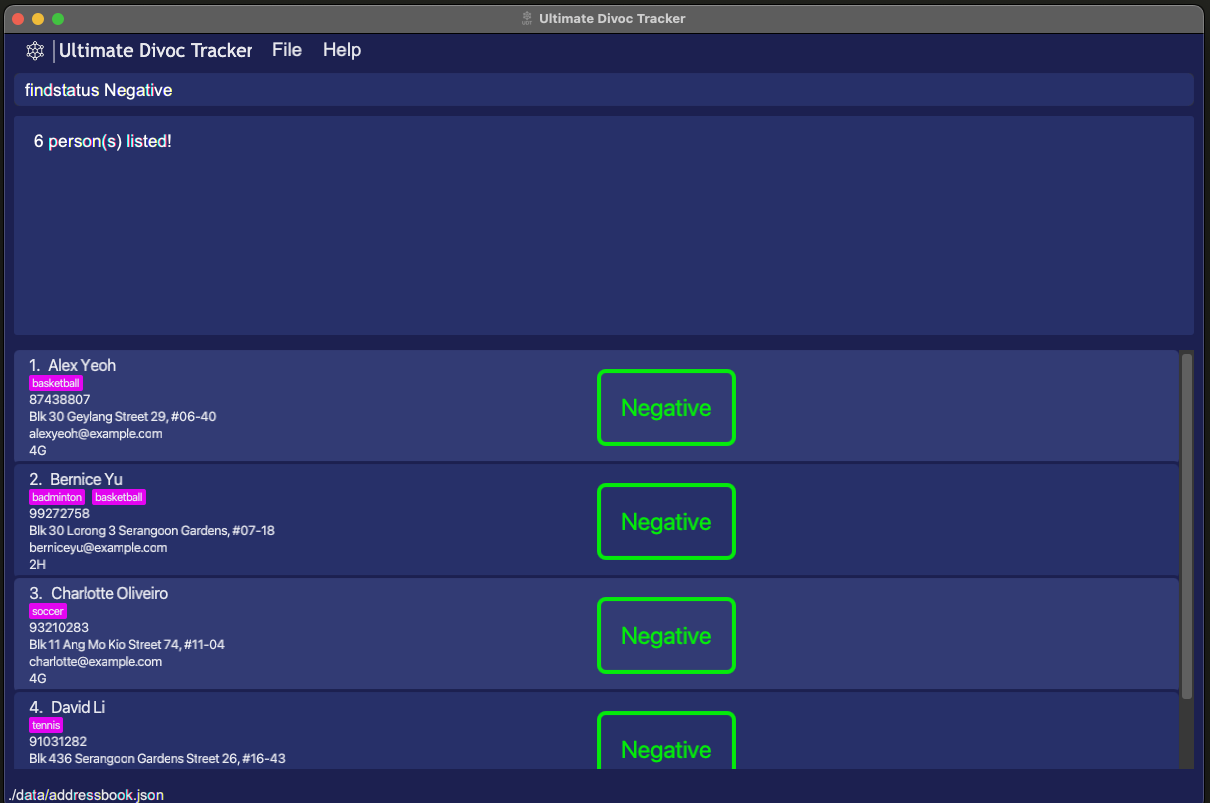
Find student by status: findstatus
Find an existing student in the application by their Covid-19 Status
- Format:
findstatus STATUS- Returns a list of students with the specified
STATUS -
STATUSis eitherpositive,negativeorclose-contact -
STATUSis case-insensitive
- Returns a list of students with the specified
- Examples:
-
findstatus positivefinds all students that are labelled COVID positive -
findstatus negativefinds all students that are labelled COVID negative
-
 |
|---|
Figure 6 - findstatus Command |
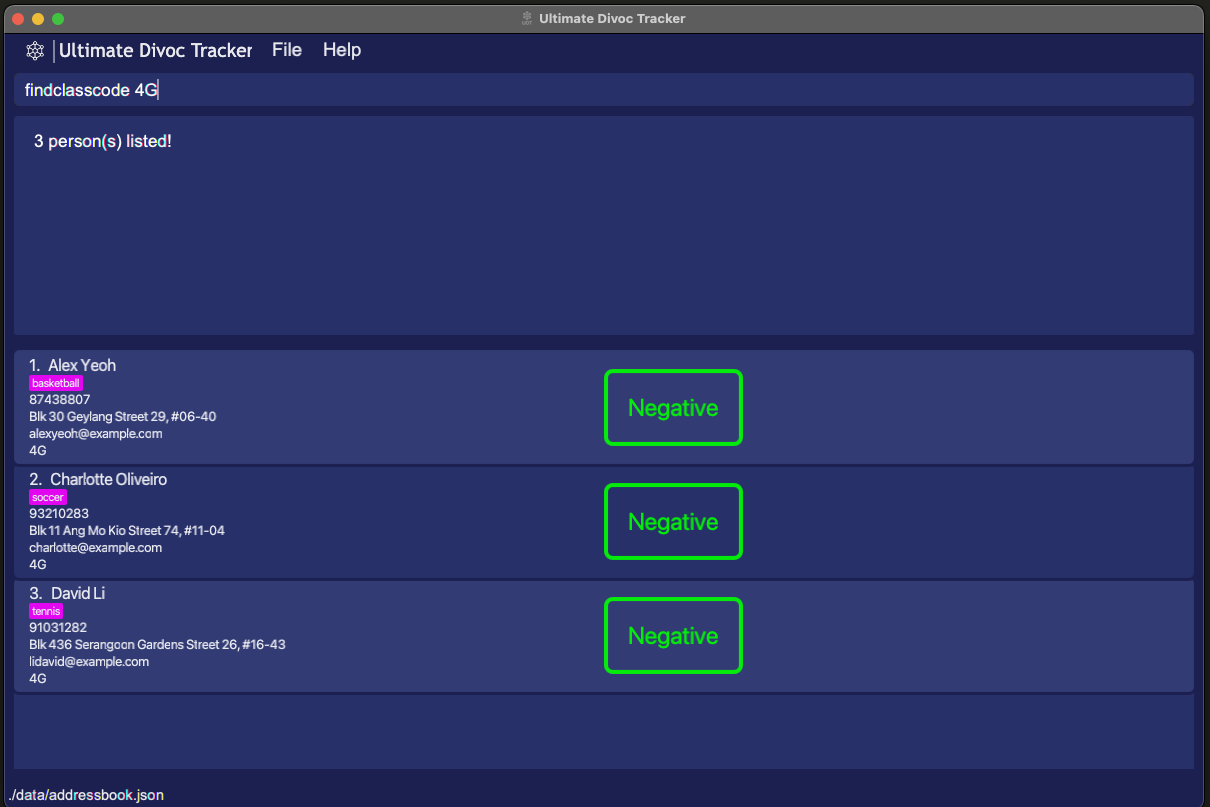
Find student by class: findclasscode
Finds an existing student in the application by their class
- Format:
findclasscode CLASS- Returns a list of students with the specified
CLASS -
CLASSis case-insensitive
- Returns a list of students with the specified
- Example:
-
findclasscode 4Afinds all students in the class 4A
-
 |
|---|
Figure 7 - findclasscode Command |
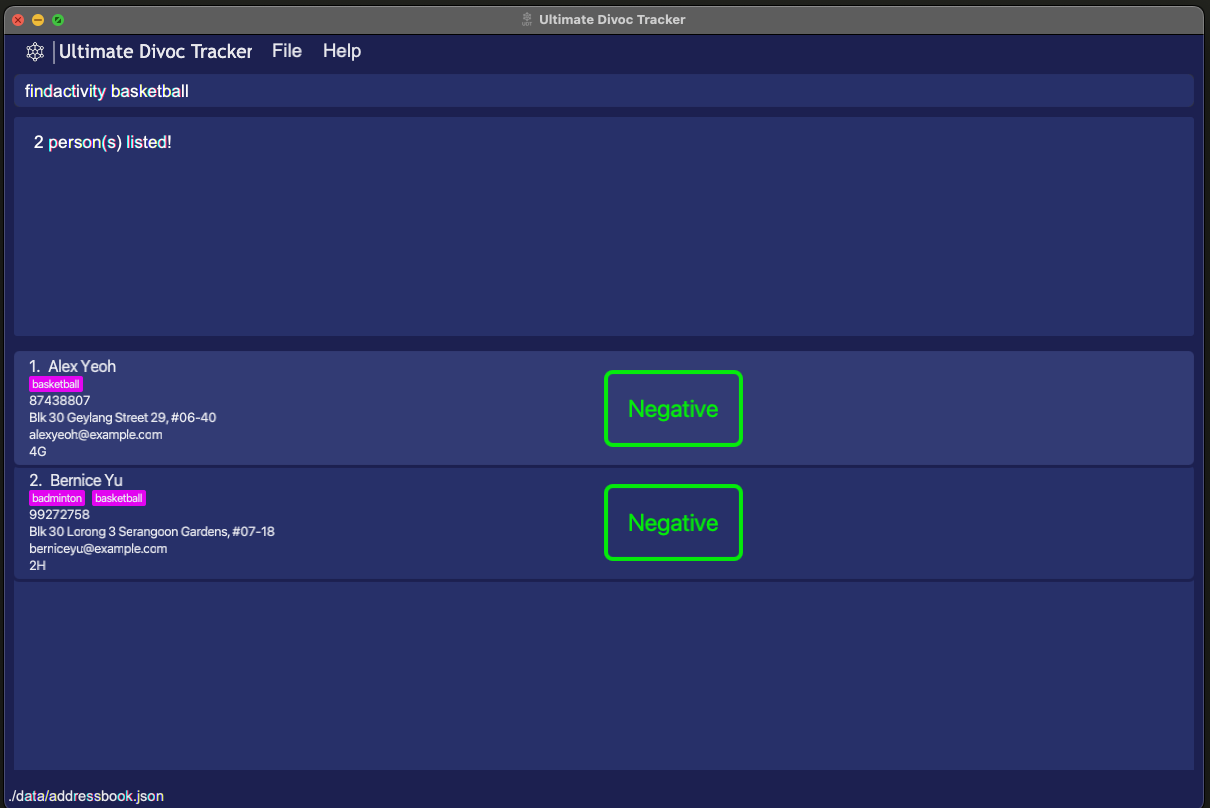
Find student by activity: findactivity
Finds an existing student in the application by the activities they are participating in
- Format:
findactivity ACTIVITIY [MORE ACTIVITIES]- Returns a list of students with the specified
ACTIVITY- Matches based on students that have specified
ACTIVITYin their list ofACTIVITIES
- Matches based on students that have specified
- If more than 1 activity is specified, command returns a list of student that participated in ANY of the activities specified
-
ACTIVITYis case-insensitive
- Returns a list of students with the specified
- Example:
-
findactivity badmintonfinds all students that have the activity “Badminton” -
findactivity badminton choirfinds all students that have the activity “Badminton”, “choir” or both
-
 |
|---|
Figure 8 - findactivity Command |
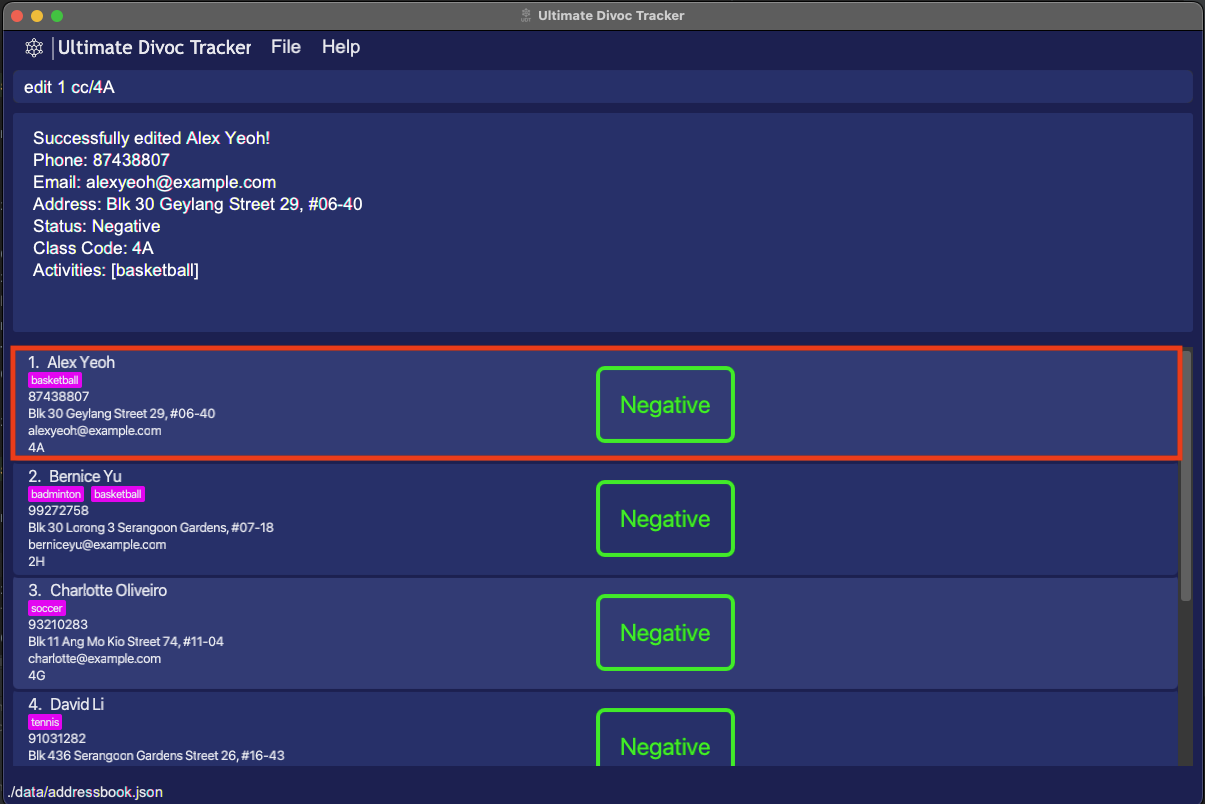
Edit student details: edit
Edits an existing student’s details in the list Index provided and the parts that you want to edit
- Format:
edit INDEX [n/NAME] [p/PHONE_NUMBER] [e/EMAIL] [a/ADDRESS] [cc/CLASS] [s/STATUS] [act/ACTIVITY] [act/MORE ACTIVITIES]- Edits the student at the specified
INDEX -
INDEXdenotes the list index of the student in the displayed list -
INDEXmust be a positive integer (1, 2, 3…) - Only listed fields will be changed
- Edits the student at the specified
- Examples:
-
edit 1 s/Positiveedits 1st student to be COVID-19 Positive -
edit 5 p/98641865 e/maryjane@yahoo.comedits 5th student to a new phone number and email address
-
- Filter the student list via find commands to make finding the index easier
- Omitting parts of the student details from the command will leave them unedited
- To clear a student’s activities use
edit INDEX act/
- Capitalization of text will be reflected in the User Interface
- Editing
Activityof a student will replace all activities with the newly added ones- Eg.
edit 1 act/tenniswill replace theActivityof the 1st student in the list with “tennis”
 |
|---|
Figure 9 - edit Command |
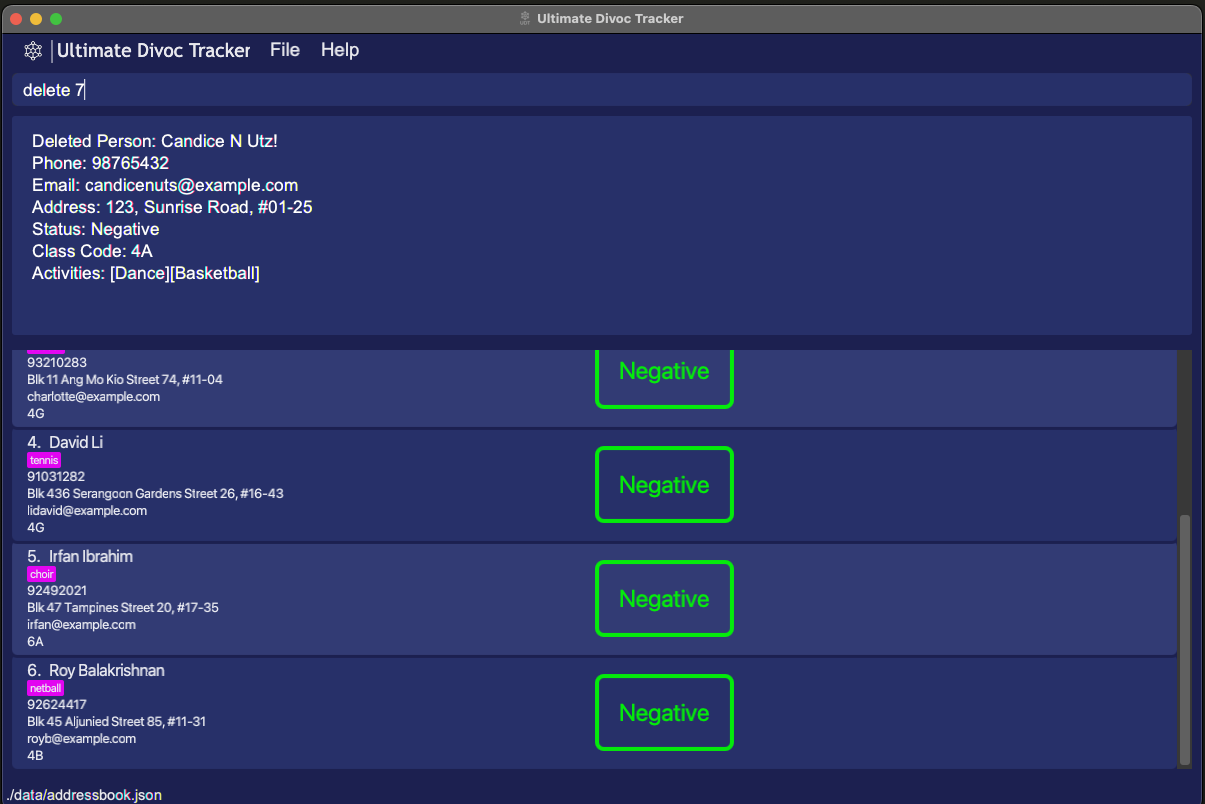
Delete a student: delete
Deletes the specified person from the application.
- Format:
delete INDEX- Deletes the student at the specified
INDEX -
INDEXdenotes the list index of the student in the displayed list -
INDEXmust be a positive integer (1, 2, 3…)
- Deletes the student at the specified
- Examples:
-
listfollowed bydelete 2deletes the 2nd person in the student list -
find Betsyfollowed bydelete 1deletes the 1st student in the results of thefindcommand
-
 |
|---|
Figure 10 - delete Command |
Automation of Status
Status denotes the COVID status of an individual, and can take either Positive, Negative or Close-contact states.
- UDT will automatically label individuals as
Close-contactfromNegativeif they are in the same class or activity as another person who is labelledPositive - UDT will also automatically label individuals as
NegativefromClose-contactif they are not close-contacts to any individuals labelledPositiveanymore.
Limitations of automation
- UDT may not automatically update students’
Statusif complex edits are executed. e.g. Changing a COVID-19 Positive student’sClassCodeorActivitywill not effectively update their previous Close-Contact list. Instead, they would remain Close-Contact until someone else in the class changes their status from Positive to Negative. A remedy for this is to re-enter all student entries or use the import function that will be released in the next iteration (v1.5). - If student A recovers from COVID-19 (
Statusis changed fromPositivetoNegative), A’s status will beNegativeeven though there are stillPositivecases related to A. However, if a student related to A byClassCodeorActivitybecomes COVID-19 positive after A recovers, A’s status will be listed asClose-Contact
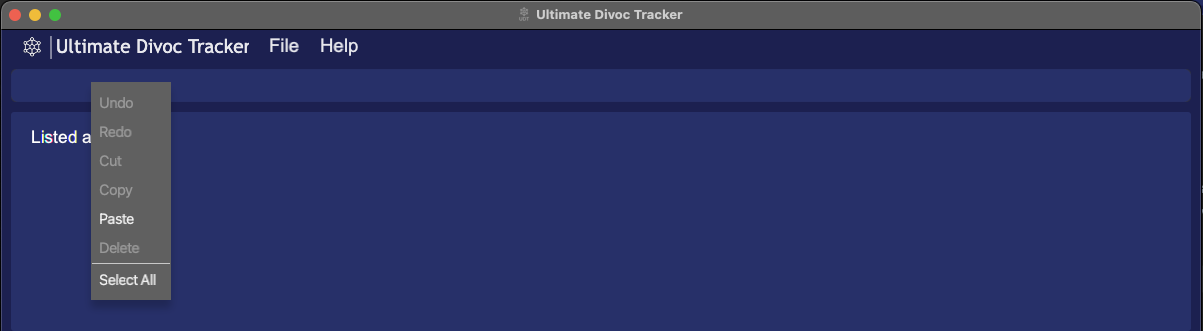
Right-Click Help Menu
 |
|---|
| Figure 11 - Right-Click Help Menu |
The following few features can be achieved through right-clicking the Command Line. Some features have keyboard shortcuts as well, so do read on to find out more.
Undo/Redo:
Undo or redo what you have been typing in the Command Line BEFORE it has been executed/entered, allowing you to make any edits as required. Refer to Figure 11 above to see the menu.
Using a Mouse:
- Right-click on the Command Line to open the menu containing the
undoandredobuttons - Click on the respective buttons to undo/redo what you have typed
OR
Using a Keyboard:
-
ctrl+zto undo -
ctrl+yto redo
Cut/Copy/Paste:
Cut any text that has been highlighted.
Copy any text that has been highlighted.
Paste any text that is currently stored in your clipboard.
ctrl+xto cutctrl+cto copyctrl+vto paste
Delete:
Removes any text that has been highlighted.
Backspacekey ordelkey on your keyboard to perform the same command
Select All:
Highlights all the text that is currently in the Command Box
cut,copyordeletecommand.
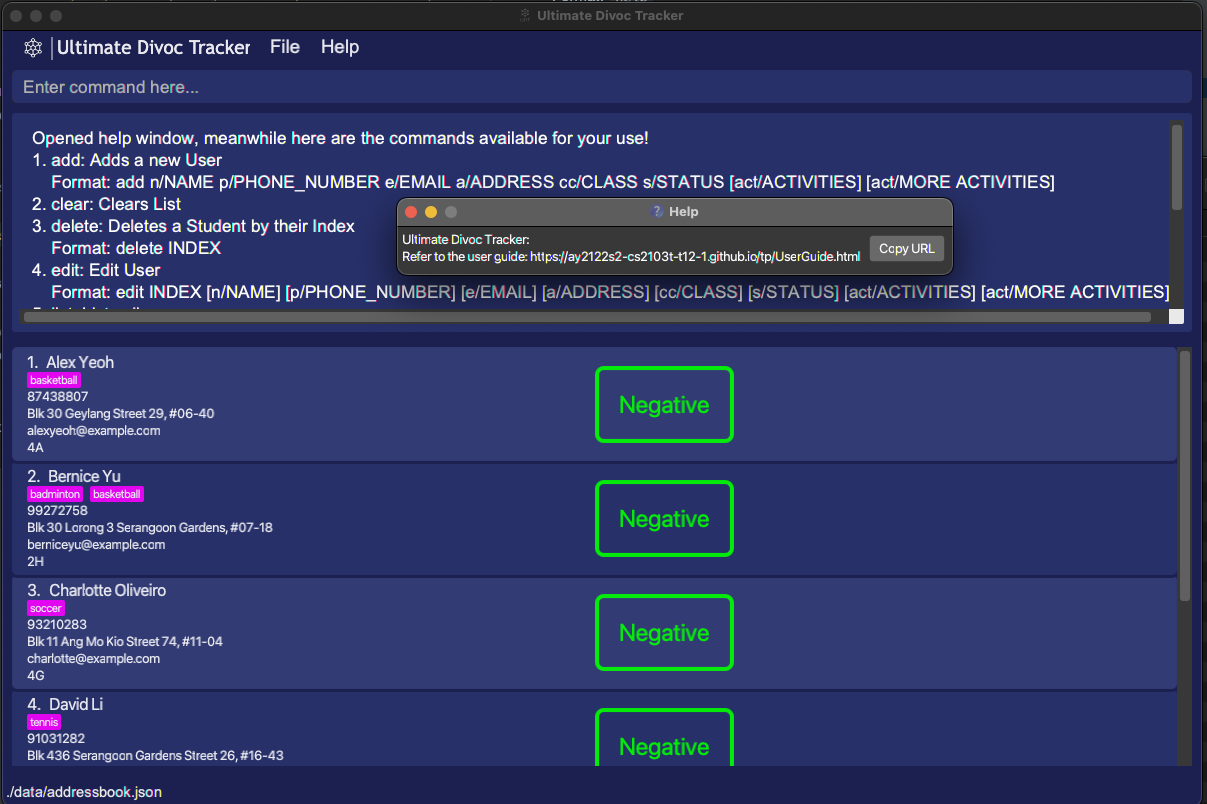
Viewing the help window: help
Displays a list of commands to use and a link to our user guide. A Copy URL button is provided to copy the link.
- Format:
help- Any user input after
helpis ignored -
help 12345 johnis the same ashelp
- Any user input after
 |
|---|
Figure 12 - help Command |
Clearing the data: clear
Clears and deletes all the data within the application
- Format:
clear- Any user input after
clearis ignored-
clear 12345 johnis the same asclear
-
- Any user input after
Warning: This deletes all data for the application irreversibly. Ensure you save a copy of the data if you intend to restore it at a later date.
Exit the application: exit
Exits the program.
Format: exit
Saving the data
UDT data is saved in the hard disk automatically after any command that changes the data. There is no need to save manually.
- Data is saved to the same location as the application executable
Editing the data file
UDT data are saved as a JSON file [JAR file location]/data/addressbook.json.
- Data is saved to the same location as the application executable
FAQ
Q: How do I transfer my data to another Computer? A: Install the app in the other computer and overwrite the empty data file it creates with the file that contains the data of your previous UDT.
Q: I edited my data file directly and now the application does not work properly! A: Delete the data folder to allow UDT to create a new data file. Your previous data has unfortunately been lost to time.
Q: Manual insertion of students takes time, is there a faster way to do it? A: We are working on a feature to allow importing of .csv files into UDT!
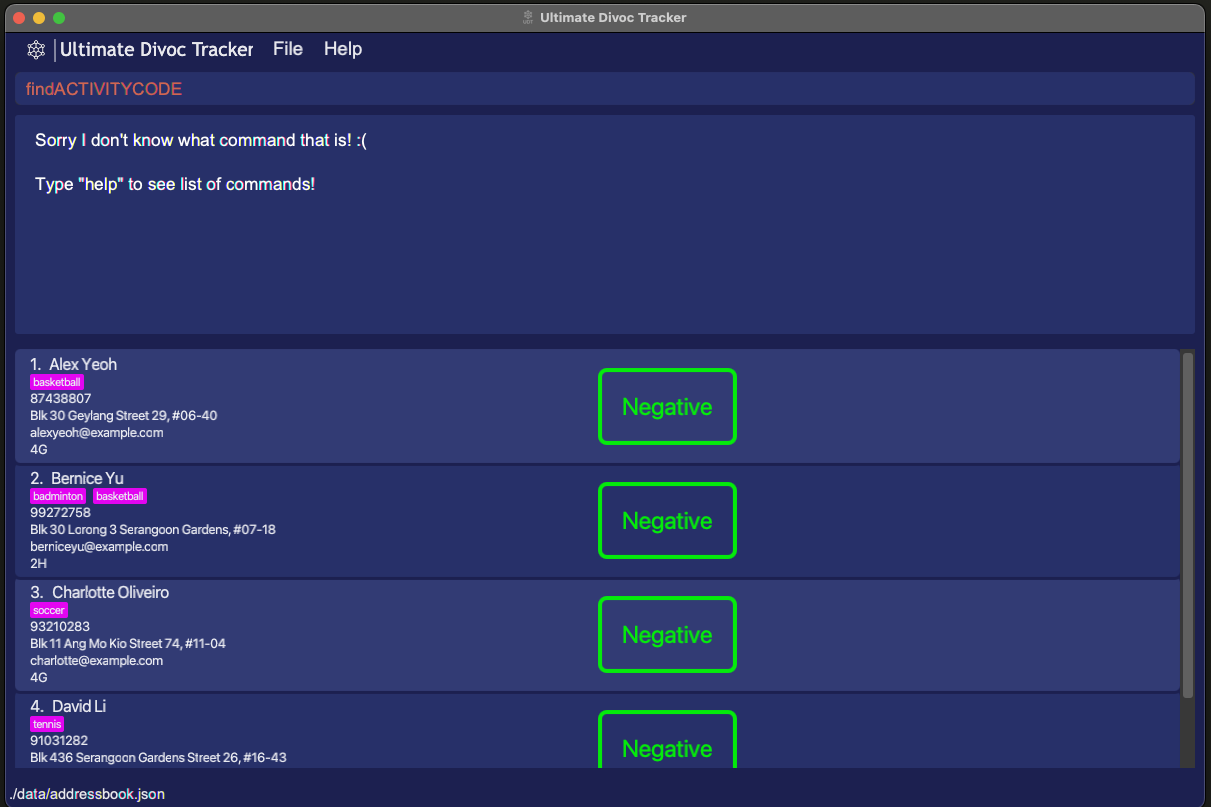
Q: What if I key in the wrong command? A: An error message colored in red will appear stating that you have typed an unknown command.
Command Summary
| Action | Format | Example |
|---|---|---|
| Add a student | add n/NAME p/PHONE_NUMBER e/EMAIL a/ADDRESS cc/CLASS s/STATUS [act/ACTIVITIES] [act/MORE ACTIVITIES] |
add n/John Doe p/98765432 e/johnd@example.com a/John Street, Block 123, #01-01 cc/5A s/Negative act/badminton |
| List all students | list |
list |
| Find student by name | find NAME [MORE_NAME] |
find James Jake |
| Find student by status | findstatus STATUS |
findstatus positive |
| Find student by class | findclasscode CLASS |
findclasscode 4A |
| Find student by activity | findactivity ACTIVITY [MORE ACTIVITIES] |
findactivity choir |
| Edit student details | edit INDEX [n/NAME] [p/PHONE_NUMBER] [e/EMAIL] [a/ADDRESS] [cc/CLASS] [s/STATUS] [act/ACTIVITIES] [act/MORE ACTIVITIES] |
edit 2 n/James Lee e/jameslee@example.com |
| Delete a student | delete INDEX |
delete 3 |
| Clear | clear |
clear |
| Exit the application | exit |
exit |
Glossary
| Term | Meaning |
|---|---|
| Parameter | Input supplied after the command |
| JSON | A file type that UDT uses to store data |
| csv | A common file type used to store data |